Whether you use social media or not, having good quality and flattering photographs is a necessary part of our trade. Photos simply cannot be avoided: from a profile picture to exercise demonstrations, social gatherings and showcasing studio space, having images that clearly portray who you are and what you do will be an important tool to build connections with clients and industry peers alike.
While hiring a photographer is a worthwhile investment, there will still be plenty of moments when you are the photographer and will need to know how to take a decent photo or five.
Here are ten tips and tricks to help you take your own fabulous photos.
- Clean your lens! This is my number one tip for anyone, anywhere, taking a photo of anything, especially with a phone. It takes just a second and will dramatically improve your image, yet you don’t have to look far to see photos that have missed this crucial step. Just use your t-shirt by lifting up the hem and wiping with the inside; it’s my regular go-to.
- Use a tripod. It’s a very worthwhile investment, but similar effects can be achieved by getting creative with small props. I have used a theraband around a WundaChair handle many times with great results. By buying a tripod you’ll save considerable time and effort, especially when it comes to framing your image. The one I use the most cost me less than $50 and fits in my handbag. Just make sure to get an attachment for your phone if it’s not included.
- Look at the light. If you’re lucky to have big windows full of natural light in your space, use this as your light source. While beautiful to look at in person and tempting to have as your background, having the window behind the camera so that the light is on your face will look significantly better most of the time. There are lots of creative things that can be done with the window silhouetting the subject, however…
- Remember the purpose of the photo. Are you demonstrating an exercise? Are you showcasing an instructor’s personality? Do you want to share your space? Keeping in mind why you are taking the photo will help set up, frame and light the image.
- Use the lenses on the back of your phone. I know, it is comforting to have the screen facing you when setting up a photo as you can see what you’re doing and it makes a quicker process, however, when it comes to lenses; size matters. There are more options and much better quality images to be found when using the lenses at the back of the phone, plus you will avoid looking at the wrong spot in the final photo/video, which so many people do.
- Change the angle. To get creative and create interest try changing the height of where you take the image from. Can you put the tripod on a high shelf and point downwards? Can you put it on the floor and point up? Setting up your frame doesn’t always have to be from hip height.
- Look at the full frame. You’ve got the tripod set up, you know what your photo is going to be about and you have the light just great; now take the time to scan what you can see in the full frame. Look at what’s in the corners and what you can see on the ceiling. Is everything in the frame necessary to the photo? Is there something distracting or that you’d rather not be seen in this picture? Taking the time now to get the crop right will save a lot of anguish later on.
- Play with the Rule of Thirds. A composition guideline in photography around where you place subjects and objects in your frame, the Rule of Thirds divides the frame evenly into thirds both horizontally and vertically. It sounds like a lot of maths however, it gets easy with practice and you are likely already doing it. Some examples include placing your horizon towards the top so that it occupies two thirds of the picture, having the subject off-centre along one of the vertical lines, or having your subject occupy two thirds of the total frame. There is a lot of creative licence at play around this principle and it is not at all a hard and fast rule. Using the Rule of Thirds as a guide is a really simple way to get great images and generally leads to compelling and well-composed shots.
- Breathe. As relevant as breath is to Pilates, it is also to Photography. The breath technique I was taught for photography, and this applies mostly to low-light, is to exhale slowly so that when all your air is gone and you are nice and still, take the photo. This doesn’t mean that every image with a phone will require this breathing technique but I mention it here to encourage you to slow down when taking a picture. Often people will move their camera/phone away at the same time as taking the photo which just creates blurry pictures. Slow down and try to have a brief pause after you take the picture so as to eliminate any possible shake. Tucking the elbows into your side is another way to get a stable, clear photo.
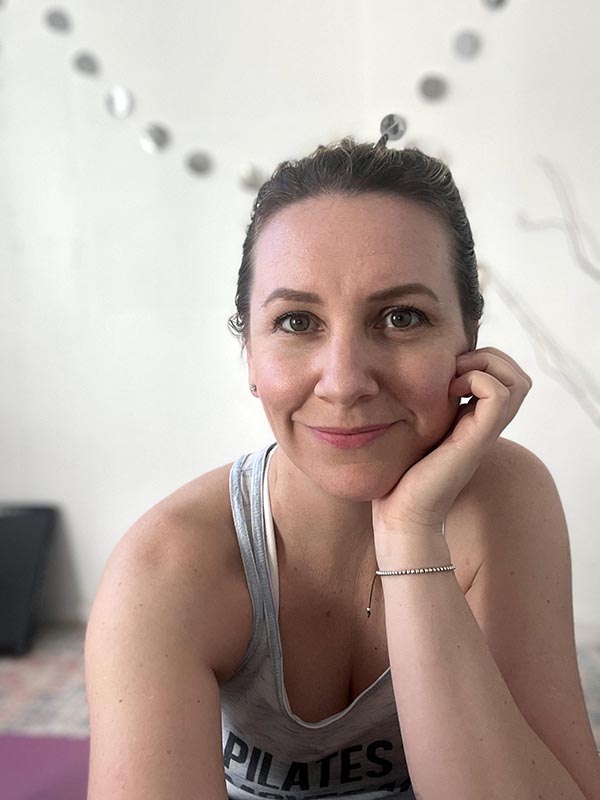
- Selfie is not a bad word! For sure there is a time and a place for an arm to be reaching from the side of frame; what party would be complete without at least a few of these?! However, when taking a professional profile photo there’s a better way. Follow these simple steps for a flattering image that won’t distort your face with a wide angle.
Here’s how to take a great portrait photo in eight simple steps:
- Find a blank wall with lots of natural light and no shadows. Look out for ceilings creating shadows half way up the wall. A way to avoid this is to sit instead of stand, either on a chair or on the floor.
- Clean the lens!
- Position your phone so that those lovely big lenses are facing where you will sit, and position it at least 1 metre distance away from where your face will be.
- Select portrait mode if you have it. This will create a soft focus and a really beautiful look. The downside of portrait mode is that you can’t get continuous photos. Portrait mode with an Apple Watch used as the controller is a really great set up. If no portrait mode, zoom your camera in a little bit. Ideally you want to have the head and shoulders visible, with an even amount of background around your head.
- Select the self-timer for 10 seconds OR use your Apple Watch as a remote and set the timer to 3 seconds.
- Step into place away from the wall. We want to avoid harsh shadows so try to be at least 30cm from your backdrop.
- For an extra bounce of light to brighten the eyes, hold a white piece of paper on your lap just out of shot.
Pose it up! It can be really strange to smile and feel natural in this circumstance so play with lots of expressions and experiment till you get it right. An industry trick for big dewy eyes is to look down until the last second, and then look straight to camera. The quick change in light creates big dilated pupils and avoids squinty eyes, which is no one’s favourite look.
So there you have it. A little guide to taking great photos, I really hope you give some of these a go. The more you practice the easier it gets however, the great thing about digital is that we can always delete and try again. I look forward to seeing your fabulous photos!
Moira Bradford, PAA Member and photographer.
About:
Moira is a Professional Level 3 Pilates Instructor (Diploma of Pilates Instruction, PilatesITC) and had a career as a portrait and wedding photographer before finding Pilates. Recently deciding to combine her two passions, Moira launched Moira Takes Photos at the end of 2022 to provide industry specific photos and videos for the Pilates Community. She lives in Brisbane.
Comments are closed.